
Growing Mushrooms at Home
Autumn is a lot of things. It’s a season of comfort and of more time spent around the kitchen and the glut of produce from the summer garden. It's when jeans make a big comeback - with an even bigger tear down the crouch line than 6 months ago - along with your favourite sweater that's been collecting moths in the wardrobe. Of course, it's also another prime growing season in its own right, but perhaps the thing that really defines autumn for me is the arrival of wild mushrooms.
As the weather cools down and rains begin to fall, the mix is the trigger for wild fungi to start spawning. Being able to forage for mushrooms is the definitive sign that autumn has arrived. As a kid I would often head out on a Sunday to my dad’s work - a quarry on the outskirts of Fremantle - and we’d go exploring for field mushrooms. The feeling of the hunt still lingers in me. It was full of anticipation and excitement, and at the end of the adventure we’d return with a boot full of wild mushrooms, with a mistaken few cow dungs thrown in.
Collecting mushrooms costs nothing, but rewards you with plenty. It combines all the best elements of the season - primarily food and adventure - and in the end lays a gift of nature right in front of you, ready for the person who has the best timing. This is the time of year when you’re seldom alone in the pine fields, a great place to saffron milk caps and slippery jacks.
The popularity of mushrooming in the wild is spawning a home growing movement too. And for the home grower that is starved of sunlight and space, this is growing that doesn’t rely on traditional growing infrastructure or conditions. It is a great practice for those with limited space because many varieties can be grown indoors with minimal light. Furthermore varieties such as oyster and shiitake offer extraordinary value as they are very costly to buy, yet inexpensive and easy to grow.
At its heart, mushroom cultivation is about propagating a very small amount of mycelium - being the vegetative part of the fungus - into larger and larger vessels. Just like a sourdough starter, we start with a tiny amount of live culture and grow it. It is a process of continual dividing and colonising. Once we get to a large enough vessel, we stop dividing and allow the mycelium to colonise and consume the entire substrate. This triggers fruit production and we get to wow our friends with a tiny forest of mushrooms growing under the couch.
Different mushrooms have distinct environmental needs, but the progression is generally quite similar for all. Serious growers and those with a penchant for precision will choose to grow from the earliest possible stages, which requires a great duty of care, sterile conditions, and lots of patience. Newbies to the adventure are probably best to start further down the growing chain. But there’s no better way to find out what you’re up for than by trying. Here's how to go about it...
Step1: Grow Mycelial Inoculant
The first stage of the journey begins with growing mycelial inoculant, which will take between 1 to 3 weeks. Add starter culture - which can be ordered online - to sterilised nutrient water or agar tray (gelatine-like food product). This must be kept in a dark, room temperature environment such as a linen cupboard or pantry. The mycelium will begin to grow through and colonise the substrate. Be aware that the risk of contamination during this stage is very high, so make sure to keep conditions as sterile as possible. If growth appears in any other colour than white, the sample should be discarded and you need to start again.
Step 2: Cultivate Grain Spawn
Now it’s time to cultivate grain spawn, a process requiring another couple of weeks. To do this divide and transfer the liquid mycelial inoculant or agar tray to a number of sterilised containers that have some grain in it; we like to use organic rye. Risk of contamination is again high, so be sure to work under sterile conditions and discard if any coloured growth appears. White mycelia will grow through the grains and colonise the jar to create “grain spawn.”
Jar should be periodically shaken (once about 25% has already been colonised) to break apart clumps and to stimulate further growth and colonisation.
Step 3: Preparing Fruiting Substrate
Once the mycelium has completely colonised the grain, it is time to prepare the final fruiting substrate. We use sugarcane mulch because we have access to a lot of it, but oyster mushrooms grow well on anything from pea straw, hardwood shavings, to coffee grounds. This is a great place for many people to start their mushroom production, as it doesn’t require completely sterile conditions. Grain spawn can be ordered online or sourced from a reputable mushroom supplier, so if growing mushrooms seems like something you’d like to try, we endeavour you to begin at this point.
To get your substrate ready for the colonised grain, you need to pasteurise it first. This is essentially submerging in it in hot water - at a temperature between 60 - 77 degrees - for about an hour and a half. For this process we put our sugar cane mulch in a pillow case and submerge it in a esky filled with hot water. The esky is large enough to hold the volume that's in the pillow case and is well insulated so the water doesn’t cool too quickly. A brick is used to weigh it down, and top up with hot water to keep the temperature in the range.
Once the mulch is pasteurised, sterilise the environment you’re working in - this includes your hands, table, utensils etc - and lay the mulch on a table to cool. Then add a good handful of gypsum and a cup of grain spawn for approximately 20L of mulch. When adding the grain spawn make sure to break up larger clumps so it’s even throughout.
Now gently pack and press down into sterilised plastic buckets to which you have previously drilled some holes and covered in paper tape. You need approximately 2-6 x 20mm holes for a 10L bucket. This is from where the mushrooms will form.
Step 5: Incubation
Place buckets in a dark location. This is now the incubation phase, and will take anywhere between 2-8 weeks to get to fruiting. Like in the previous stages, white mycelium will slowly overtake the mulch, forming little knots of tissue. Once the mycelium has fully colonised the substrate it will begin to enter the fruiting stage and the real show begins - hooray! Move the buckets to a warm, humid place with plenty of fresh air. The bathroom, laundry room, and under the couch are all good for this.
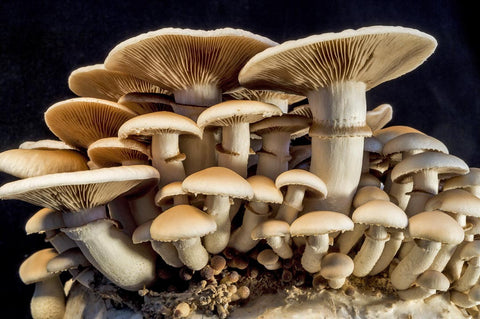
Step 6: Fruiting
This is what you get when you buy a mushroom kit - it is essentially mycelium that has fully colonised the substrate. With light and air, fruit production begins in earnest and you can remove paper tape from holes and allow growth to push out of the bucket.
Mushroom caps will progress from downturned to upturned. The best time to harvest is while they are flat, which usually occurs between 5-8 days after caps appear. Harvest mushrooms at their base with a sharp knife. Most varieties will fruit multiple times, but each batch will yield less than the one before.
Once the flushes of mushrooms are worth less than the space they occupy, it’s time to compost the spent substrate and move onto the next lot. The great thing about mushroom growing at home is that they are always in season. This is really one for the small space city grower.
-
Posted in
planting