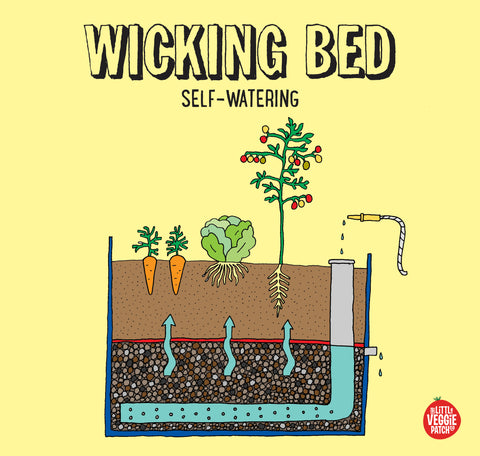
Wicking Beds 101

The wicking bed, or self-watering garden, is not that mirage of water in the desert. Rather, it is one of the most user-friendly growing infrastructures for all the lifestyle, time-poor, lazy gardeners out there.
Using the age-old idea of capillary action, water in a reservoir below is drawn up and into the soil, to be used by the plants as required. Ever dipped a tissue in a glass of water and watched the moisture climb up the fibres, defying gravity? A wicking bed works in the same way.

Water and soil are typically separated by a permeable membrane – such as geotextile fabric (kind of like felt) – that allows easier passage of moisture up from the reservoir and prevents spillage of soil down below. The wicking process will be aided by having more ‘wicks’, like that of a candle, that grab water from lower levels of the reservoir and distribute it to different points within the growing medium.
In our wicking beds we like to lay a full length of geotextile fabric from the top of one side of the bed, all the way along the bottom, up to the top of the other side. This means that even when the reservoir is almost empty, it will be collecting moisture.
The self-watering function, however, is not instantaneous. It’s a slow journey of moisture from the bottom of the soil right up to the top, so initial surface watering for new seeds and seedlings is required. Once plants are established, the wick will be in effect and ready to switch over to autopilot.
In summer, when we revel in an abundance of warm-season crops AND a week or two of holidaying, the wicking bed really earns its keep. As long as your reservoir is topped up and the surface has been well mulched, your plants will welcome your return with garnishes for your homecoming cocktails.
While size, materials and construction vary, the underlying principle is that plants’ roots can draw water whenever they need it. As long as there is water in the base, plants will essentially water themselves. As water – or the lack of it – always seems to be at the crux of unsuccessful food gardening, the wicking bed may well be the answer to one of our greatest gardening problems.
(Check out our self watering challenge from a few years back to see how successful we were growing plants in the middle of a hot summer on a hot rooftop using a Glowpear balcony planter)
Little Veggie Patch Co Wicking Beds
Everything is in constant evolution, and so are our wicking beds. Years ago we had the overflow valve at the junction of the scoria and soil, and although this worked well for filling up the reservoir, it made emptying the water out a challenge (a flush of the system is necessary every 6 months to aerate the water and to prevent the soil from becoming anaerobic). We now have the overflow valve on a swinging arm, allowing the water to be emptied with a simple turn of the arm.
If you ever consider installing your own wicking bed, or perhaps getting a DIY pack from us, here is a quick visual guide on how to set them up;
And here's how we do it for our Full DIY Wicking or our Half DIY Wicking packs.
If our sized wicking beds are a little beyond your scope, perhaps look into some other units that are more suited to smaller spaces. You can check them out here.
-
Posted in
infrastructure


