
How to Build a Wicking Bed
![]()
All life, whether in plant form or otherwise, is made up almost entirely of water and relies on it more than anything for survival. We ourselves begin life at our most water condensed version - approximately 75-80% of the stuff - but then develop more dry matter and regulate to 65-70%. Having once been obsessed with Survivorman, Les Stroud, I know that we can survive more than three weeks without food but less than three without water. This makes a few millimetres of moisture condensed overnight on a tarp a more valuable proposition than a mouthful of miniature rock crabs.
Plants however trump us and are made up of around 80-90% water. It’s a statistic that always reminds us that, while we may forget to do any number of things in the garden, the one thing we mustn’t forget is to water. This unfortunately is never the case. The simple truth is that we’re constantly forgetting to give our plants the one thing they are screaming at us for, and for those joking about having black thumbs of death - do you see your plants laughing? No, nor can your hear their piercing shrills and cries for hydration.
We truly believe that there is no such thing as a bad gardener, only a forgetful waterer. We often don’t have enough time to shower ourselves in the morning - yet alone our plant friends - so we need to find more foolproof methods of getting moisture to the garden. This is the strength of a wicking bed.

Everyone will remember the year 3 science experiment where a tissue was dipped into a glass of water and the moisture ‘wicked’ up through the fabric, defying gravity. This is the process of capillary action and fundamental to the function of a wicking bed. Otherwise known as a ‘self watering garden’ - no, not the mirage in the desert it sounds like - wicking beds pull water into the soil from a reservoir below. The plants can then decide how much to use and when.
A wicking bed has a number of advantages over traditional irrigation system, particularly with this ability to ‘self-water’ without the aid of an expensive control timer. And unlike those systems that need to be programmed by a person trying to foresee the plants’ needs, a wicking bed feeds water directly to a plants’ roots when they require it. There is little wastage of water through evaporation, which is further minimised through good mulching practices.
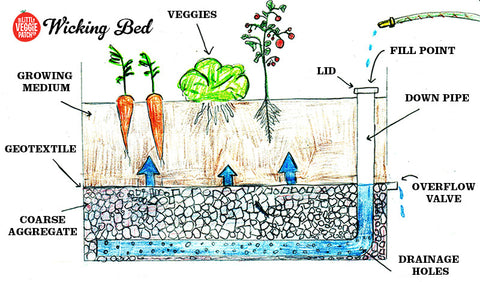
Most experts set the maximum depth of soil for a wicking bed at 25cm - this being the maximum distance water is able to be pulled up through the soil. Considering most vegetables and herbs need about the same soil depth for their root growth, it seems a readymade match. We also allow 25cm of depth to hold the water reservoir below. A large body of water to draw from will make it more effective over a longer period of time, such the couple of weeks you leave your plants alone over the Christmas holidays. So when building one a vessel that is approximately 50cm deep is ideal.
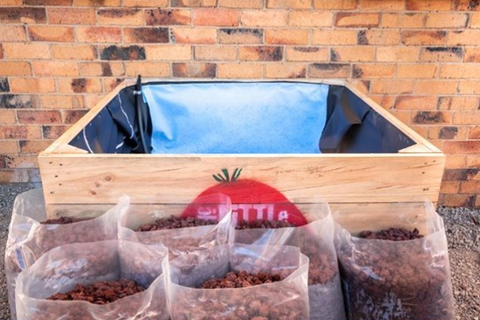
When creating a wicking bed the first step will involve lining the base (what will become the reservoir) with a non-porous, rigid liner that will hold the water. Make sure it is pushed snuggly up against the walls and into any corners, so there is less pressure on the material once filled with scoria and water. Any small punctures or splits will leak water and be painful to fix - very painful indeed - so be careful when handling. If you’re looking to do this part on a budget, you can use a thick builders film but you should play it safe by double layering. Otherwise, a pond liner will be more foolproof, albeit it more expensive.
Next come the components that feed water in and out of the wicking bed. An inflow channel, that will be used to fill up and then top up the reservoir, should lead to the bottom of the wicking bed and sit on an inch or two of scoria. To create this leader channel we use 50mm PVC piping which is fitted to a length of slotted agi-drain to allow the even flow of water in. Stagnate water sitting in the reservoir may attract mosquito and their larvae, therefore the inflow channel should be capped when not in use. Next, and most importantly, secure an overflow valve to the side of your vessel. This dictates the depth of the reservoir and, as mentioned earlier, should be no more than 25cm from the top of your wicking bed. When you fill up or top up your reservoir, water overflowing from this valve indicates your wicking bed is full.

Now fill up the reservoir with a fine grade scoria, which is a porous volcanic rock available from all landscape supply yards. This not only makes the reservoir a solid platform onto which you can then add soil, but helps aerate the water and makes for more effective capillary action. The finer the grade of scoria, the better it does these jobs and the less potential there is for punctures of your reservoir liner.
As you fill up with scoria, we like to put ‘wicks’ - like those on a candle - that will pull water from the lower parts of the reservoir to mid points of your soil. For this we use strips of a fabric called geotexile, (which is very much like felt) because it is made up of small, dense fibres that wick incredibly well. Although the soil will do this job fine by itself, these will make the system work better when the reservoir is at low levels, which may buy you extra time on your summer holiday; system may not need a top up for three weeks rather than two.
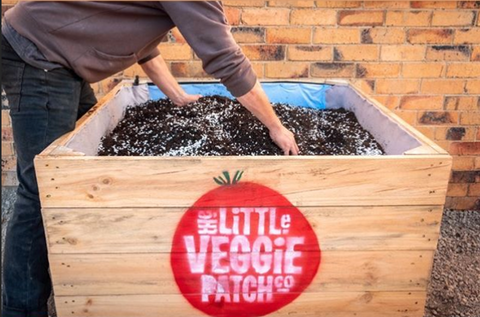
Finally it is time to add a growing medium for our plants. Wicking bed systems tend to favour soils that have high levels of organic matter and compost (generic soils found in garden centres tend to compact up and prohibit the capillary process) so it is worthwhile investing in good quality compost and potting mix. We have also found the benefit in adding 1 part perlite to 10 parts soil, which helps in reducing compaction over time. To keep the soil out of the reservoir we also use the geotextile fabric. Lay a sheet on top of the scoria and attach it up the sides of the wall using a staple gun. Of course don’t staple it in the reservoir section unless you want to put holes in liner!
This enclosed style of growing means that there is very little wastage of water as it is constantly recycled through the system until it is used. Such is also the case for the nutrients, which can be fed in liquid form directly to the reservoir. It does however mean that the water can become a little funky - algae can build up and make it toxic to plants - and so you should flush the water through the system every 12 months.
Although they are commonly referred to as self watering gardens they are not silver bullets. All young plants will need surface watering to begin. If you’re worried about over doing it at this stage - don’t - any extra water will come out of the overflow and by using a good quality soil mix it won’t become saturated. Once the plants are about a month old, the self watering affect begins to kick in. And remember, that while you may be impressed with your garden’s ability to water itself, pests such as possums, rats or birds, couldn’t care less.
So while wicking beds will take care of a large chunk of the watering part, they will not do everything for you (we'll have robots for that soon) and shouldn’t stop you from spending more time in the garden.
If you'd like a little veggie patch co staff member (almost as efficient as a robot) to install a wicking bed for you, you can find the details here
You can find more info at Wicking Beds 101
-
Posted in
infrastructure